

Get Started with 3D Printing and Raspberry Pi

When we came out with the stamping feature, we wanted to allow users to customize their prints as much as possible. It’s not only useful to add your name, logo, or tagline to prints, but also fun - you can add texture, patterns, and or your own unique designs. Since the release, we’ve seen stamping on coasters, placeholders, garden markers, and picture frames, to name only a few!
This tutorial will teach you how to customize models using the CANVAS stamping feature, and make your own mini computer. It’s a simple project that uses 3D printing and a Raspberry Pi, so it’s a great way to get started with these technologies. Other parts include a Raspberry Pi 3B+, LCD screen, as well as a bluetooth keyboard. Many of the materials can be found at a hardware or hobby store. By the end of this project, you will:
3D print your own mini computer case
Use Stamping to customize a model
Learn how to assemble a simple computer
This project is a great entry point into physical computing. You can take this project a step further by remixing our models for the casing, using different peripheral devices like adding a speaker or camera, or trying different apps on the RPi. Use this project as a sandbox for your curiosity.
Materials
- Raspberry Pi 3 B+
- microSD card
- 3.5 inch LCD screen
- Power bank OR provided Raspberry Pi power supply
- Bluetooth keyboard
(Note* the keyboard shown in this article is discontinued. The keyboard model in the link has one rounded edge).
- USB - micro USB cable
- 3M velcro
- Painter's Tape
or Double-sided tape
- 50 mm M3 screws (x2) and hex nuts (x2)
Instructions
1. Print the parts and remove supports. The parts are printed at 0.25mm layer height, with 3-4 perimeters, 15% infill density and supports. You can find the models on Thingiverse if you would like to remix them.
2. Install Raspberry Pi OS onto microSD card.
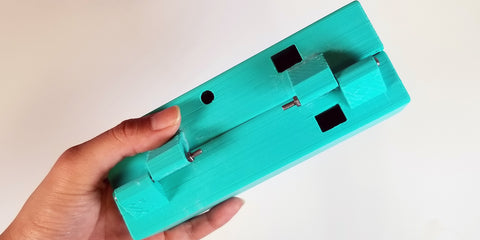
3. Connect the top and bottom casing together with the screws and hex nuts:
4. Remove the USB bluetooth adapter from the keyboard, and insert into one of the USB ports on RPi:

5. Install screen onto Raspberry Pi. Align the edge of the screen connector to the furthest left pins on the RPi:

6. Plug in power supply to the RPi to boot it up, connect to Internet and configure RPi with initial preferences by following the startup wizard. Remove power supply once complete.
7. Find the center position for the RPi and screen in the top casing. Use small squares of velcro on the back of RPi to attach to the top casing. You can use a marker to draw the position for the RPi.

2. Install Raspberry Pi OS onto microSD card.
3. Connect the top and bottom casing together with the screws and hex nuts:
4. Remove the USB bluetooth adapter from the keyboard, and insert into one of the USB ports on RPi:
5. Install screen onto Raspberry Pi. Align the edge of the screen connector to the furthest left pins on the RPi:
6. Plug in power supply to the RPi to boot it up, connect to Internet and configure RPi with initial preferences by following the startup wizard. Remove power supply once complete.
7. Find the center position for the RPi and screen in the top casing. Use small squares of velcro on the back of RPi to attach to the top casing. You can use a marker to draw the position for the RPi.
Adjust position so Raspberry Pi is centered, remove the adhesives and stick in place. Place the screen cover so it fits into top lid. You can use double sided tape along the edge of the screen cover:

8. Slide power bank into bottom case, so the USB port faces out. You can use some tape to keep the power bank in place:

9. Power on and place keyboard on top of power bank

10. Plug in the USB cable to power bank.

11. Insert the micro USB into the RPi, and enjoy your new mini computer!

8. Slide power bank into bottom case, so the USB port faces out. You can use some tape to keep the power bank in place:
9. Power on and place keyboard on top of power bank
10. Plug in the USB cable to power bank.
11. Insert the micro USB into the RPi, and enjoy your new mini computer!